Small bathrooms are basically the New Zealand condition. Whether you’re in a 1920s Auckland villa with its awkwardly narrow ensuite, a Wellington apartment where the bathroom is roughly the size of a large wardrobe, or a Christchurch bungalow where the original bathroom clearly wasn’t designed with modern living in mind — cramped bathrooms are something most Kiwi homeowners know intimately.
The good news: small doesn’t have to mean sad. With the right layout choices, materials, and a few clever tricks, even the most space-challenged bathroom can feel considerably larger, more stylish, and genuinely enjoyable to use. And in 2026, the design options available to New Zealand homeowners have never been better.
This guide is built specifically for small bathroom design in a New Zealand context — informed by what’s actually working in local renovations, what the best NZ designers are recommending, and where most of the generic guides available online completely miss the mark.
Why Small Bathroom Design Is Different in New Zealand
Before diving into ideas, it’s worth understanding the specific challenges Kiwi homes face that most international guides don’t account for.
The heritage home factor. A huge proportion of New Zealand’s housing stock consists of villas, bungalows, and state homes built before 1970 — often with bathrooms that were added in or retrofitted into small, awkward spaces. The bones are often charming but the dimensions are unforgiving.
Humidity and ventilation. New Zealand’s climate — humid in the north, damp in winter across the South Island — means moisture management is a genuine design concern, not just a footnote. Mould, peeling paint, and condensation are real problems in poorly ventilated small bathrooms. Under the NZ Building Code, mechanical extraction ventilation is typically required, and any renovation that ignores this will look worse over time regardless of how good it looked on day one.
The consent question. Any significant plumbing work in New Zealand requires a licensed plumber and, in many cases, a building consent. Moving fixtures — shifting a toilet or vanity to a new wall — always involves consents. This matters because the most powerful layout improvements often require a small amount of plumbing relocation, and understanding what’s involved upfront saves painful surprises.
With those realities in mind, here’s what actually works.
Layout First, Everything Else Second
This is the most important principle in small bathroom design — and the one most guides skip over to get to the pretty pictures faster.
Before you choose a tile or a tapware finish, think hard about your layout. The arrangement of fixtures (toilet, vanity, shower) determines how large or small a bathroom feels more than any decorative choice.
In a narrow room, a freestanding bathtub may not work. A one-wall layout that lines up shower, toilet, and vanity on the same wall makes sense in most cases — and it’s also the most budget-friendly option in terms of plumbing.
The key layout principles for small NZ bathrooms:
- Wet wall efficiency: Keep all your wet fixtures on as few walls as possible — this minimises waterproofing costs and keeps the floor plan cleaner
- Door direction: A door that swings inward into a small bathroom steals usable floor area; consider a sliding door, a cavity slider, or a door that opens outward if your layout allows
- Toilet placement: In very small bathrooms, pushing the toilet into a corner or tucking it against a side wall frees up the visual centre of the room and makes the space feel less cluttered
- Separate the toilet if you can: In homes with some flexibility in adjacent space, separating the toilet into its own small room while dedicating the rest to shower/vanity dramatically improves how both spaces feel and function
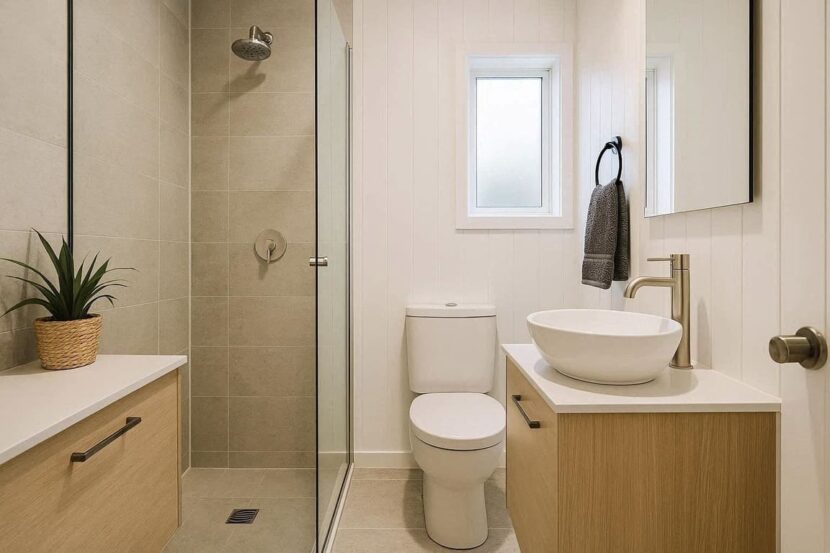
The Glass Shower: Your Best Friend in a Small Bathroom
If there’s one single upgrade that reliably makes a small NZ bathroom feel larger, it’s replacing an enclosed or curtained shower with frameless glass.
Glass shower doors provide the impression that the room is much larger, thanks to their transparency and the ease with which they blend in with the rest of the wall. They also have a very opulent, glossy appearance.
The logic is simple: glass allows your eye to travel through the full depth of the room rather than stopping at an opaque wall or curtain. The visual boundary disappears, and the bathroom reads as a single connected space rather than a series of boxed-off zones.
Options for NZ homes:
- Frameless frameless glass panel — the cleanest look; a single fixed panel with no frame or minimal hardware
- Semi-frameless sliding door — works well in narrow bathrooms where a hinged door would swing into the space
- Full wet-area/wet room — level entry, no shower tray, floor-to-ceiling tiles, a single glass panel or none at all; very popular in contemporary NZ renovations and excellent for accessibility
Note: frameless glass requires quality installation and appropriate waterproofing beneath it. This is not a DIY project. Get a licensed plumber and tiler involved.
Floating Vanities: The Space-Creating Essential
A wall-hung or floating vanity is one of the most effective space-creating tools in a small bathroom — and it’s become a genuine standard in New Zealand renovation design.
A wall-hung vanity creates the illusion of more space and allows for easy cleaning underneath — perfect for busy homes.
By lifting the vanity off the floor and revealing the floor surface underneath it, you extend the visible floor area of the room. The bathroom feels bigger because you can see more of it. It also makes cleaning considerably easier — no awkward mopping around floor-mounted cabinet legs.
What to look for in a NZ context:
- Choose a floating vanity with concealed or integrated storage — a small bathroom can’t afford to sacrifice the storage that floor-mounted cabinetry typically provides
- Opt for a slightly narrower depth (400–450mm rather than the standard 500mm) to gain meaningful floor space in a tight bathroom
- Wall-hung vanities require solid blocking in the wall behind them; this needs to be planned during any renovation rather than added afterwards
Tiles: Size, Colour, and Pattern All Matter
Tiles are arguably the highest-impact decorative decision in a small bathroom — and there’s a lot of conflicting advice about what to do with them.
Here’s the honest breakdown:
- Tile size: Contrary to what you might have heard, large-format tiles (600x600mm or bigger) often work better in small bathrooms, not worse. Fewer grout lines means a cleaner, more continuous visual surface, which reads as larger. Wall-mounted vanities, slimline toilets, and frameless glass showers help create a spacious, streamlined look without sacrificing luxury. Large tiles reinforce that streamlined look.
- Tile colour: Light tiles on floors and walls reflect more light and visually expand the space. If you want to add colour or a feature tile, confine it to a single wall — the back wall of the shower recess is the ideal location, because it adds visual depth rather than making the room feel smaller.
- Feature tiles worth considering: Even in smaller spaces, New Zealand homeowners are opting for bold feature tiles — whether it’s geometric patterns, vibrant colours, or textured finishes. These add a focal point while maintaining a modern aesthetic. A single wall of handmade terracotta-look tiles, a bold geometric pattern, or a richly veined marble-look porcelain turns a small bathroom into something that feels genuinely considered rather than simply squeezed.
- Grout colour: Use a grout colour close to your tile colour rather than contrasting white grout — it reduces visual “noise” and makes the surface read as more continuous.
Colour and Palette: Warm, Not Just White
The reflexive answer for small bathrooms used to be “go all white.” And while white has its place, a purely white bathroom can feel cold and clinical rather than spacious — particularly in New Zealand homes where natural light is often limited in south-facing bathrooms.
Earthy greens, plum tones, and deep terracotta hues are making their way into small bathroom spaces. The key is understanding how to use colour in a small space:
- Use warm whites and soft off-whites as a base — not cold, blue-toned whites
- Introduce colour on a single feature wall or through cabinetry rather than across every surface
- Deep, moody tones (navy, forest green, charcoal) can actually work well in small bathrooms when used consistently — a bathroom painted entirely in a dark tone feels intimate rather than claustrophobic, provided there’s good lighting
- Pair tiles in soft, herby green with warm timber for a calm, grounded vibe that embraces the textures of the natural world — this combination is having a particularly strong moment in NZ bathrooms right now
Lighting: The Upgrade That Costs Less Than You Think
Most small New Zealand bathrooms are dramatically underlit — a single ceiling downlight doing all the work of making a damp, often windowless space feel welcoming. It doesn’t work.
Layered lighting is the secret to making any bathroom feel like a retreat — task LEDs at the vanity, recessed ambient spots, and a single mood pendant create different scenes without clutter.
The small bathroom lighting brief:
- Backlit or side-lit mirror — vanity lighting that illuminates your face rather than casting shadows from above; this is both more functional and more flattering
- Recessed downlights in the ceiling on a dimmer — warm white (2700–3000K), never cool white
- Under-vanity LED strip — a subtle accent that adds depth and reinforces the floating effect of a wall-hung vanity
- A skylight if at all possible — for small bathrooms with roof access, a skylight transforms a dark space into something genuinely beautiful; natural light at its most effective
One specific NZ tip: heated towel rails do double duty in small bathrooms as both towel storage and a gentle heat source — particularly valuable in South Island winters. They’re one of the most universally recommended additions to NZ bathroom renovations for good reason.
Storage: Hidden, Integrated, and Ruthless
Small bathrooms have no room for clutter — literally. Every item left on a benchtop, every bottle collection on a shower shelf, makes the space look and feel smaller.
The best storage solutions for compact NZ bathrooms:
- Recessed niches in shower walls — tiled to match, they hold shampoo and soap with no visual intrusion and no annoying shower caddies
- Mirror cabinets — a mirrored cabinet above the vanity instead of a standard mirror gives you storage and reflection in the same footprint; a double win in a small space
- Tall, narrow cabinetry — a slim floor-to-ceiling linen cupboard uses vertical space that would otherwise be wasted
- Closed storage over open shelving — open shelves look great in styled photoshoots and accumulate clutter in real life; closed joinery keeps the visual noise down
- Closed storage is not only a sensible solution but will also give your space a cleaner, more modern appearance — perfect for a modern small bathroom design.
The Details That Make the Difference
Once the layout, fixtures, and tiles are sorted, it’s the smaller details that separate a good small bathroom from a genuinely impressive one.
Tapware and hardware: Brushed metallics — warm metals like champagne, gold, and bronze — add quiet elegance without overpowering the space. Matte black is equally popular in NZ right now. The key is consistency: pick one finish and use it everywhere — tapware, towel rail, toilet roll holder, door handles.
Mirrors: A larger mirror than you think you need. Full-width mirrors above the vanity, or floor-to-ceiling mirror panels on one wall, significantly amplify both light and the sense of space.
Plants: Even one small plant — a trailing pothos on a shelf, a peace lily on the windowsill — adds life to a bathroom that might otherwise feel a little sterile. In NZ bathrooms with good light and genuine humidity, plants actually thrive without much effort.
Scent: A diffuser or a simple candle in a small bathroom transforms it from functional to genuinely pleasant in seconds. This sounds minor but it’s the detail most people forget — and one that visitors always notice.
A Note on Budgeting in New Zealand
Small bathroom renovations in New Zealand typically range from around $8,000–$15,000 for a mid-range refresh (retiling, new vanity, tapware, shower, lighting) up to $25,000–$40,000 for a full structural renovation involving layout changes and consent.
The highest-return investments for a small bathroom, in order:
- Layout improvement (if possible without prohibitive plumbing cost)
- Frameless glass shower
- Wall-hung vanity with integrated storage
- Lighting upgrade
- Tapware and hardware replacement
You don’t have to do everything at once. Even tackling just one or two items from that list will meaningfully improve a small bathroom — and each improvement makes the next one feel more worthwhile.
The Bottom Line
Small bathrooms are a constraint. But constraints, approached thoughtfully, produce better design decisions than unlimited space and budget usually do. The best small bathrooms in New Zealand are some of the most beautifully resolved interiors in the country — intimate, warm, and meticulously considered.
Start with the layout. Fix the lighting. Add glass. Choose your tiles carefully. And let the details do the rest.